Categories
Hardware Ubuntu

Find BIOS version using Ubuntu

I found this really simple way of finding the installed BIOS version on an Ubuntu PC without having to reboot. Simply execute the following command in a terminal session and scroll through the output until you find the BIOS section.

sudo dmidecode -s bios-version

For more system information, just scroll through the output until you find what you need.

sudo dmidecode | more

Update August 2012
I have successfully installed Lubuntu 10.04 on an old Toshiba Tecra 8000 (Pentium Mobile 233 with 256MB of RAM) and found that this trick to find the BIOS version did not work. The BIOS in my old Tecra is older than 1999 and doesn’t have the Desktop Management Interface present.

Categories
FreeSwitch Hardware

Camrivox Flexor 500 SIP Telephone

Camrivox Flexor 500

I recently purchased three Flexor 500 telephones to use with my new FreeSwitch installation at home.

So far, I am quite pleased with the telephones although I am still in a process of discovering their capabilities. It appears that these phones are popular with VoIP providers that sell service to end users with a preconfigured phone. My three, fortunately, were unlocked or otherwise unprovisioned which gave me full access to the telephone’s built in web based configuration so I can use them with my own PBX.

One thing I noticed very early on was that the phone’s DTMF tones were not being processed by FreeSwitch. An example of this was FreeSwitch refusing to respond to any keys pressed when in the default IVR. As I already had a working X-Lite Softphone I knew the fault was likely to be with the Flexor 500 but I couldn’t find the setting. Then after a couple of days I noticed some tiny links at the bottom of the Main Menu page. Yup, I need glasses. Anyway, the Voice Settings link took me to a new page where I could select DTMF = SIP and Inband. FreeSwitch only needs SIP for the IVR, but with Inband there is audible confirmation.

Categories
Hardware

Acer DX900 Smartphone

I bought an Acer DX900 Smartphone last September without actually trying one out first. That was a big mistake. The phone’s specification is impressive but it’s the dual SIM card capability that I really needed. I had a look at some Samsung Duos models and they were very good, but none of them at that time had WLAN. It wasn’t long before I started to discover how less than half baked the DX900 is, and how dissapointing Acer’s support can be. The Product Manager for this model is non existent.

After more than seven months of use, I am now ready to accept that I was exceptionally stupid to buy this phone without trying it first. I am stuck with it now for at least another year or more. Having to pull the battery out every day to restart the phone after it crashes is becoming very tiresome.

Note to self:

(1) Never knowingly buy anything made by Acer.
(2) Never buy a phone that has a Microsoft Operating System.

Categories
Hardware Nagios

Monitoring a Linksys WAG200G using SNMP

I have been using a Linksys WAG200G as a wireless access point since December 2007. I’m not using it for my broadband connection as I have a separate firewall and router already on my network. It has been running reliably without any problems since installed and it occurred to me that it had been some time since I had used the device’s administration page or reviewed Cisco’s patch history for it.

Using the web interface, the installed firmware was shown to be version 1.0.9, which was some way behind the current 1.1.9 release. I couldn’t find the release notes for any versions prior to 1.1.5 so I decided to upgrade the firmware to be certain that any known vulnerabilities had been patched.

After exploring the device’s web interface, I remembered that the little router supported SNMP. I didn’t have a NMS when it was installed so I had left this feature unconfigured. Now that I have a Nagios console it was time to activate the SNMP management. I set the device name to the same name that it’s IP resolves to in my DNS (wap101). I then set the monitoring IP address and trap target address to that of my NMS. Finally, I set the read community to public, and the write community to private.

From a command prompt on my NMS, I dumped a list of the management functions supported by the WAG200G using this command…

snmpwalk -v1 -c public 192.168.1.30 -m ALL .1

My Linksys uses 192.168.1.30 for it’s Ethernet interface. Change it to your device’s IP address if you are going to try it yourself. Redirecting the output to a file is useful for future reference.

A sample output of snmpwalk looks like this

IF-MIB::ifInErrors.1 = Counter32: 0
IF-MIB::ifInErrors.2 = Counter32: 0
IF-MIB::ifInErrors.3 = Counter32: 0
IF-MIB::ifInErrors.4 = Counter32: 0
IF-MIB::ifInErrors.5 = Counter32: 0

My WAG200G is only used as a WLAN access point, so I apologise now for not covering anything to do with monitoring ADSL or anything other than the Ethernet and WLAN interfaces in the Host and Service Definition file for my WAG200G. If you want to monitor more, just pick the relevant items required from the MIBs reported by snmpwalk and add them to your Nagios services. Think about the outputs and what conditions they need for alerts if any. Most of mine only need to alert if the result increases from zero. This is the list of services I am only interested in monitoring:-

  • PING
  • Uptime
  • eth0 IN Discarded Packets
  • eth0 IN Errors
  • eth0 IN Unknown Protocols
  • eth0 OUT Discarded Packets
  • eth0 OUT Errors
  • eth0 Operational Status
  • wlan0 IN Discarded Packets
  • wlan0 IN Errors
  • wlan0 IN Unknown Protocols
  • wlan0 OUT Discarded Packets
  • wlan0 OUT Errors
  • wlan0 Operational Status

I found that Nagios doesn’t like non-unique service descriptions, which is why my descriptions take the form shown above. Click here to view my Host and Services Definitions for the WAG200G.

The host definition inherits from the generic-switch template and looks like this…

# Define the switch that we'll be monitoring
define host{
use generic-switch ; Inherit default values from a template
host_name wap101 ; The name we're giving to this switch
alias Linksys WAG200G ; A longer name associated with the switch
address 192.168.1.30 ; IP address of the switch
hostgroups switches ; Host groups this switch is associated with
}

Each service inherits from the generic-service template and looks something like this…

# Monitor Port 4 (wlan0) number of errors in via SNMP
define service{
use generic-service ; Inherit values from a template
host_name wap101
service_description wlan0 IN Errors
check_command check_snmp!-C public -o ifInErrors.4 -c 0 -m IF-MIB
}

I used the documentation on check_snmp to prevent critical warnings for zero values (-c 0). In time, if any of my services start seeing errors I can change them to use a warning range and a critical range instead.

My Ubuntu 9.10 package install of Nagios was missing the command snmp_check. I added the following code to the bottom of my /etc/nagios-plugins/config/snmp.cfg to get SNMP working as the vital command was missing for some reason.

define command{
command_name check_snmp
command_line $USER1$/check_snmp -H $HOSTADDRESS$ $ARG1$
}

Categories
Hardware Ubuntu

Upgrading the CPU on a Dell GX240

2.6Ghz Celeron

My two recently acquired Dell GX240 PCs were surprisingly quick with the 1.6Ghz Pentium 4 processors and Ubuntu. However, after some research I discovered that the GX240 motherboard is capable of using a more powerful processor without having to change to faster RAM. A quick search on eBay located two used SL6VV (2.6Ghz Celeron) processors for £3.95 each (including postage!) and they were promptly purchased.

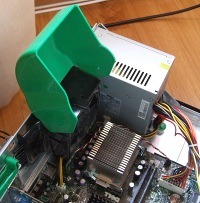
The upgrade itself is very easy. Simply open the case, flip up the green heat-sink shroud and unclip and remove the heat-sink. Release the socket ZIF lever and swap out the processor with the new one. Replace the heat-sink, clips and shroud, close the case and restart the PC. During the boot phase, press F2 to go into the BIOS setup. The main page will provide immediate confirmation that the Celeron has been recognised.

I bought a syringe of CPU heat-sink grease but I didn’t need it. The stock heat-sink had a thermally conductive sticky pad that stayed stuck to it instead of the processor. The pad was in good condition so I decided to reuse it to avoid trying to clean it off.

GX240 fan shroudUsing the CPU benchmark in BOINC, the results of the 1.6Ghz Intel Pentium 4 were…

778 floating point MIPS (Whetstone)
1644 integer MIPS (Dhrystone)

After installing the 2.6Ghz Intel Celeron the benchmark showed a substantial improvement…

1327 floating point MIPS (Whetstone) per CPU
3532 integer MIPS (Dhrystone) per CPU

Verdict

The performance of Ubuntu Desktop 9.10 running on a Dell GX240 with a 1.6Ghz Intel Pentium 4 and 512MB RAM is surprisingly good. Upgrading the CPU to a 2.6Ghz Celeron has made the old PC feel a little faster for most GUI applications that I use. I suspect a higher performance GPU would make a more noticeable improvement.

Since installing the faster processors, one of the GX240s will ‘freeze’ after a few hours of running. I suspect that the 2.6Ghz CPU is overheating as the stock heatsink is dependent on the shrouded case fan exhausting heat from the case. I am going to change the passive heatsink for a fan cooled version.

I bought another two SL6VV processors for £2.49 each and I am now on the lookout for a pair of Socket 478 coolers. Despite the small setback due to passive cooling, this upgrade was worth doing considering how cheap it was.

Categories
Hardware Ubuntu

Brother MFC-660CN printer for Ubuntu 9.10

I have a Brother MFC-660CN all-in-one network printer on our LAN and it has been performing admirably for nearly three years. I was so impressed with this printer that I bought a MFC-680CN for my parents and another for use at home.

Each of the Windows PCs has the complete multifunction driver set installed and can print, FAX and scan over the network with ease. I would like to be able to do the same with the Ubuntu Desktops but I suspect that it is going to be a little trickier getting the network scanning and network FAX functions operational. This page is just concerned with getting network printing running.

I have used CUPS before and have already decided that I am going to use an Ubuntu PC setup as a server on the LAN as a print server to share the printer with the other desktops.

Fortunately, Brother has good driver support for Linux. I followed these instructions on their website but it is a little confusing in places as it references multiple Linux distributions. To make things easier for myself, I am summarizing the method for Ubuntu 9.10 here.

Download and save to disk the ‘deb’ format of the LPR driver and the cupswrapper driver.

Open a terminal on the Ubuntu ‘print server’ PC to type in the commands to install the drivers. I used “Applications”, “Accessories”, “Terminal” from the GUI.

sudo aa-complain cupsd
sudo mkdir /usr/share/cups/model
sudo ln -s /etc/init.d/cups /etc/init.d/lpd
sudo mkdir /var/spool/lpd
sudo apt-get install csh
sudo apt-get install psutils

I downloaded the LPR and cupswrapper driver to the ‘Downloads’ folder in my home directory so I changed the current working directory to that folder.

cd ~/Downloads
sudo dpkg -i –force-all mfc660cnlpr*deb
sudo dpkg -i –force-all mfc660cncupswrapper*deb

Check that the LPR and cupswrapper drivers are installed:-

dpkg -l | grep Brother

I had the following result confirming that the drivers were installed.

ii mfc660cncupswrapper 1.0.1-1 Brother CUPS Inkjet Printer Definitions
ii mfc660cnlpr 1.0.1-1 Brother lpr Inkjet Printer Definitions

To access the CUPS web interface, point your browser at http://localhost:631/printers

Under ‘Queue Name’, click the name of the printer (MFC660CN).

There should be two button menus displayed, ‘Maintenance’ and ‘Administration’. Click the ‘Administration’ button menu and select ‘Modify Printer’
You will be prompted to login, use your usual Ubuntu credentials.

Select ‘LPD/LPR Host or Printer’ and click Continue.

For ‘Connection:’ enter lpd://printer/binary_p1 where printer is the hostname or IP address of the printer that the LPR and cupswrapper drivers will print to. Then click Continue.

Enter a Description and Location. Share the printer by ticking the check box. Click Continue.

The printer driver that you just installed should be selected. Click ‘Modify Printer’ to activate the changes.

The ‘Administration’ button menu has a ‘Set Default Options’ selection. You can use this to change your paper type to A4 size.

To print a test page, click the ‘Maintenance’ button menu and select ‘Print Test Page’

You should now have a working CUPS print server.

Categories
Hardware Ubuntu

NEC MultiSync 5FGe on Ubuntu 9.10

I recently bought two used and abused Dell GX240 PCs for a software development project I am currently working on. I don’t have a spare LCD monitor to use with them at the moment but the guy that sold me the PCs also had some old CRTs that he wanted to get rid of. So, for an additional £3, a heavy 17″ CRT monitor is now on my desk. It takes up a lot of space, but for only £3 it’s a small sacrifice.

Ubuntu Desktop 9.10 installed on the GX240 without issue. However, the maximum resolution displayed was 800×600. I knew from previous experience of the NEC 5FGe was that it could go higher. In fact, the maximum resolution is 1024×768. Not much by today’s standards, but a lot better than 800×600.

The X-Window system from X.Org in Ubuntu is considered to be so good at doing device detection now that the traditional manually edited configuration file xorg.conf is no longer present when installed. This is great for most Flat Panel monitor users, but not that good for people using old fashioned display cards with CRT monitors. Fortunately, xorg.conf is still supported and it is possible to get old junk running at or near its best.

It took a while searching for the info on various web sites but it was worth doing. My 5FGe is running at 1024×768 and is good enough to use to type this. As I know I will probably need to do this again someday, I thought it would be worthwhile documenting the process while it was still fresh in my mind.

With Ubuntu Desktop running the GUI, press Ctrl+Alt+F1 together to switch to a character terminal interface.

At the prompt, login with your Ubuntu user ID and password. When logged in your current working directory should be your home directory.

Enter the following to shutdown the GNOME Display Manager:-

sudo service gdm stop

Enter the following to generate a basic xorg.conf file to work with:-

sudo Xorg -configure

At this point, you should have an xorg.conf.new file in your home directory. Copy this configuration file to the /etc/X11 directory.

sudo cp xorg.conf.new /etc/X11/xorg.conf

If you know what settings your display equipment needs in the xorg.conf file, now is the time to edit it to include them. You will need to know the ‘Modeline’ info for the display resolution. I chose to specify 1024×768 at 60hz refresh as that was a safe starting point. The GTF program can be used to generate a suitable Modeline. To make things easy, I redirected GTF’s output to append to xorg.conf .

sudo gtf 1024 768 60 >> /etc/X11/xorg.conf

I have got used to using Nano for editing files on Ubuntu but you can use whatever editor you like as long as you achieve the same result.

sudo nano /etc/X11/xorg.conf

Edit the section for the monitor settings so that it looks like this:-

Section "Monitor"
Identifier   "Monitor0"
VendorName   "NEC"
ModelName    "MultiSync 5FGe"
HorizSync    31-62
VertRefresh  55-90
Option       "DPMS"
# 1024x768 @ 60.00 Hz (GTF) hsync: 47.70 kHz; pclk: 64.11 MHz
Modeline "1024x768_60.00"  64.11  1024 1080 1184 1344  768 769 772 795  -HSync +Vsync
EndSection

You must cut and paste the GTF output from the end of the file and insert it inside the Monitor section. These settings work for my NEC MultiSync 5FGe. Note that each Modeline is a single line in the file. The comment output from GTF doesn’t hurt if present with a leading #.

Next add the Device info for the display adapter. My Dell GX240 has an AGP graphics card that I am still looking for more X.Org info regarding suitable tweaks. For clarity, I’m not showing all the commented out options below. If you have an ATI Rage 128 Pro Ultra TF your settings will look something like this:-

Section "Device"
Option     "Display" "CRT"
Identifier  "Card0"
Driver      "r128"
VendorName  "ATI Technologies Inc"
BoardName   "Rage 128 Pro Ultra TF"
BusID       "PCI:1:0:0"
EndSection

The important option for the NEC MultiSync 5FGe is:-

Option     "Display" "CRT"

Almost done editing now. Just need to add all of the colour depth settings for the 1024×768 screen mode in the ‘Screen’ section:-

Section "Screen"
Identifier "Screen0"
Device     "Card0"
Monitor    "Monitor0"
DefaultDepth 16
SubSection "Display"
Viewport   0 0
Depth     1
Modes    "1024x768"
EndSubSection
SubSection "Display"
Viewport   0 0
Depth     4
Modes    "1024x768"
EndSubSection
SubSection "Display"
Viewport   0 0
Depth     8
Modes    "1024x768"
EndSubSection
SubSection "Display"
Viewport   0 0
Depth     15
Modes    "1024x768"
EndSubSection
SubSection "Display"
Viewport   0 0
Depth     16
Modes    "1024x768"
EndSubSection
SubSection "Display"
Viewport   0 0
Depth     24
Modes    "1024x768"
EndSubSection
EndSection

Save the file.

Restart the X-Window system using your new xorg.conf by entering the following at the command prompt.

sudo service gdm start

Once the GUI restarted on my PC, I clicked ‘Restart’ just to be sure that the AGP card and monitor were initialised properly. Then I went to ‘System’, ‘Preferences’, ‘Display’ and found that Xorg had now detected that my monitor could run at 75Hz despite not stating a Modeline for it. I have left mine running at 75Hz and all seems to be well so far.